Biolab > Training > Technology
Micropipettes
Smaller volumes (down to 0.1mL) of liquid can be accurately and precisely measured and dispensed using a calibrated glass or plastic tube called a pipette. Much smaller volumes of liquids (down to 0.1µL) require the use of a micropipette. Most micropipettes are adjustable-volume micropipettes. There are several general sizes of micropipettes that can be adjusted within the following ranges: 1-10 µl (P10), 2-20 µl (P20), 10-100 µl (P100), 20-200 µl (P200), and 100-1000 µl (P1000). In the Biology 1100 level courses, we will use the P100 micropipettes.
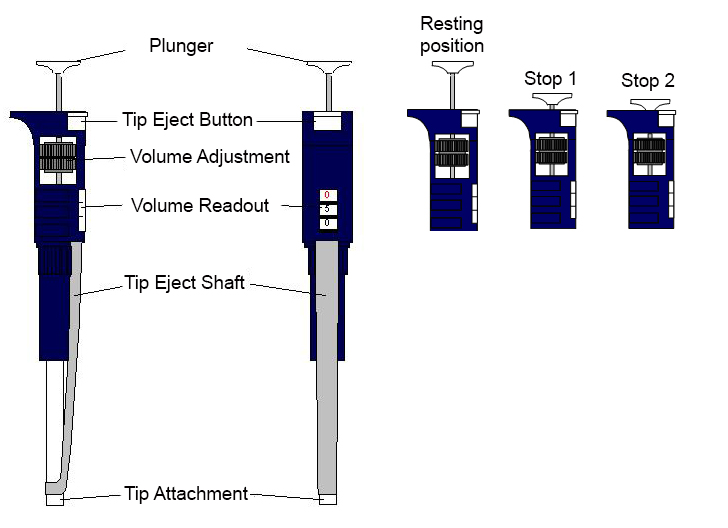
Micropipettes have a plunger that is depressed using the thumb and as the plunger is released, liquid is drawn into a disposable plastic tip. When the plunger is pressed again, the liquid is expelled. The disposable tips allow the micropipette to be used for different samples (the tip must be changed between samples). Tips are loaded onto the end of the micropipette by pushing the end of the device into the tip. Once used, tips are ejected into a disposal bin using the tip eject button that is next to the plunger.
- Before adjusting the volume, determine to which volume range the micropipette belongs. Never try to force the volume control dial beyond the indicated range on the micropipette housing.
- Using the volume control dial, adjust the volume within the correct range.
Most micropipette plungers have a resting position and two stop positions. The first stop position is reached by pushing down on the plunger until resistance is met. The first stop is the correct stop. The second stop position is reached by pushing down from the first stop. For the purpose of gel electrophoresis in the 1100-level courses*:
- Depress the plunger to the first stop and place the disposable micropipette tip attached to the micropipette into the DNA sample.If you go to the second stop, you will draw too much liquid into the tip. The most common pipetting error with micropipettes is missing the first stop and thus drawing too much liquid into the tip.
- Release the plunger and watch as the sample is drawn into the tip.
- Remove the tip from the DNA sample liquid.
- Insert the tip into the correct well of the gel. You may need to steady your hand by resting the micropipette against the back of your other hand.
- Slowly depress the plunger to the first stop* which will expel the DNA sample into the well.
- Do not release the plunger.
- Remove the tip from the gel well and then release the plunger.
*Please note: if you are measuring and mixing reagents, loading plates, etc. you would expel the solution by pressing the plunger to the second stop position.
- Never use a micropipette without a tip.
- Always pipette gently, releasing the plunger button slowly. Letting the button pop up causes liquid to splash into the tip and can contaminate the plunger.
- Never force the volume control dial, even if the volume indicator shows that the pipette has been damaged by improper handling, its volume indicator can be very inaccurate. Forcing the dial could make things worse.